
Do you have a lot of things you'd like to learn, but find it hard to stay on track? HeroMode has helped me with my continuous learning journey, most recently with learning SwiftUI. In today's post, I'll share how I use HeroMode to structure learning a new technology. I'll also compare my experience with SwiftUI to that of React Native. Achieve your learning goals by staying organized and motivated with HeroMode!
Like many developers, I enjoy learning new technologies. Recently, when a small side project came up, I decided to use this opportunity to try something new, and learn SwiftUI.
HeroMode for Continuous Learning
It's not always easy to find time and motivation to learn new things, while juggling work, family, and other responsibilities. HeroMode makes it easier by allowing me to organize my learning goals, track my progress, and keeping me motivated.
I created a new adventure in HeroMode called "Learn SwiftUI and be a Swiftie" (a funny adventure name can be motivating!). When I find online resources or tutorials to work through, I add them as quests. My favorite aspect of using HeroMode for learning is the quest chaining feature, which allows me to learn step by step.
For example, I started with Apple's official SwiftUI tutorial, which has four chapters. So I created four quests, and locked each (except the first chapter) by their predecessor.
Then, as I complete each chapter, the quest for the next chapter is automatically unlocked!
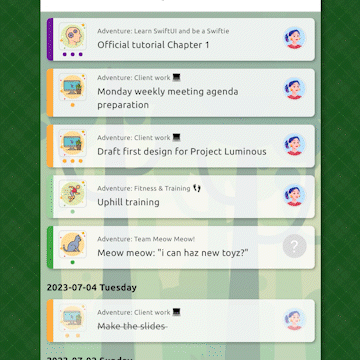
This makes it easy for me to track where I am in the tutorial. It also gives me a sense of accomplishment as I complete each chapter. Whenever I have some free time at night or on the weekend, I can check HeroMode and see which SwiftUI quest I can work on. This helps me utilize bits and pieces of my time into a continuous learning journey.
Comparison with React Native
We built HeroMode with React Native, so I can't help but compare my SwiftUI experience with that of React Native.
Highlight: Component-level Live Preview
SwiftUI development happens within Xcode. Within Xcode, you can have a live simulator preview side-by-side with your code. And this preview just keeps updating as you type code and navigate from file to file. Hot reloading is also supported in React Native (say, if you run a simulator through Expo), so the first part is not that surprising. But the second part, where the preview automatically renders the component you are viewing, is very convenient.
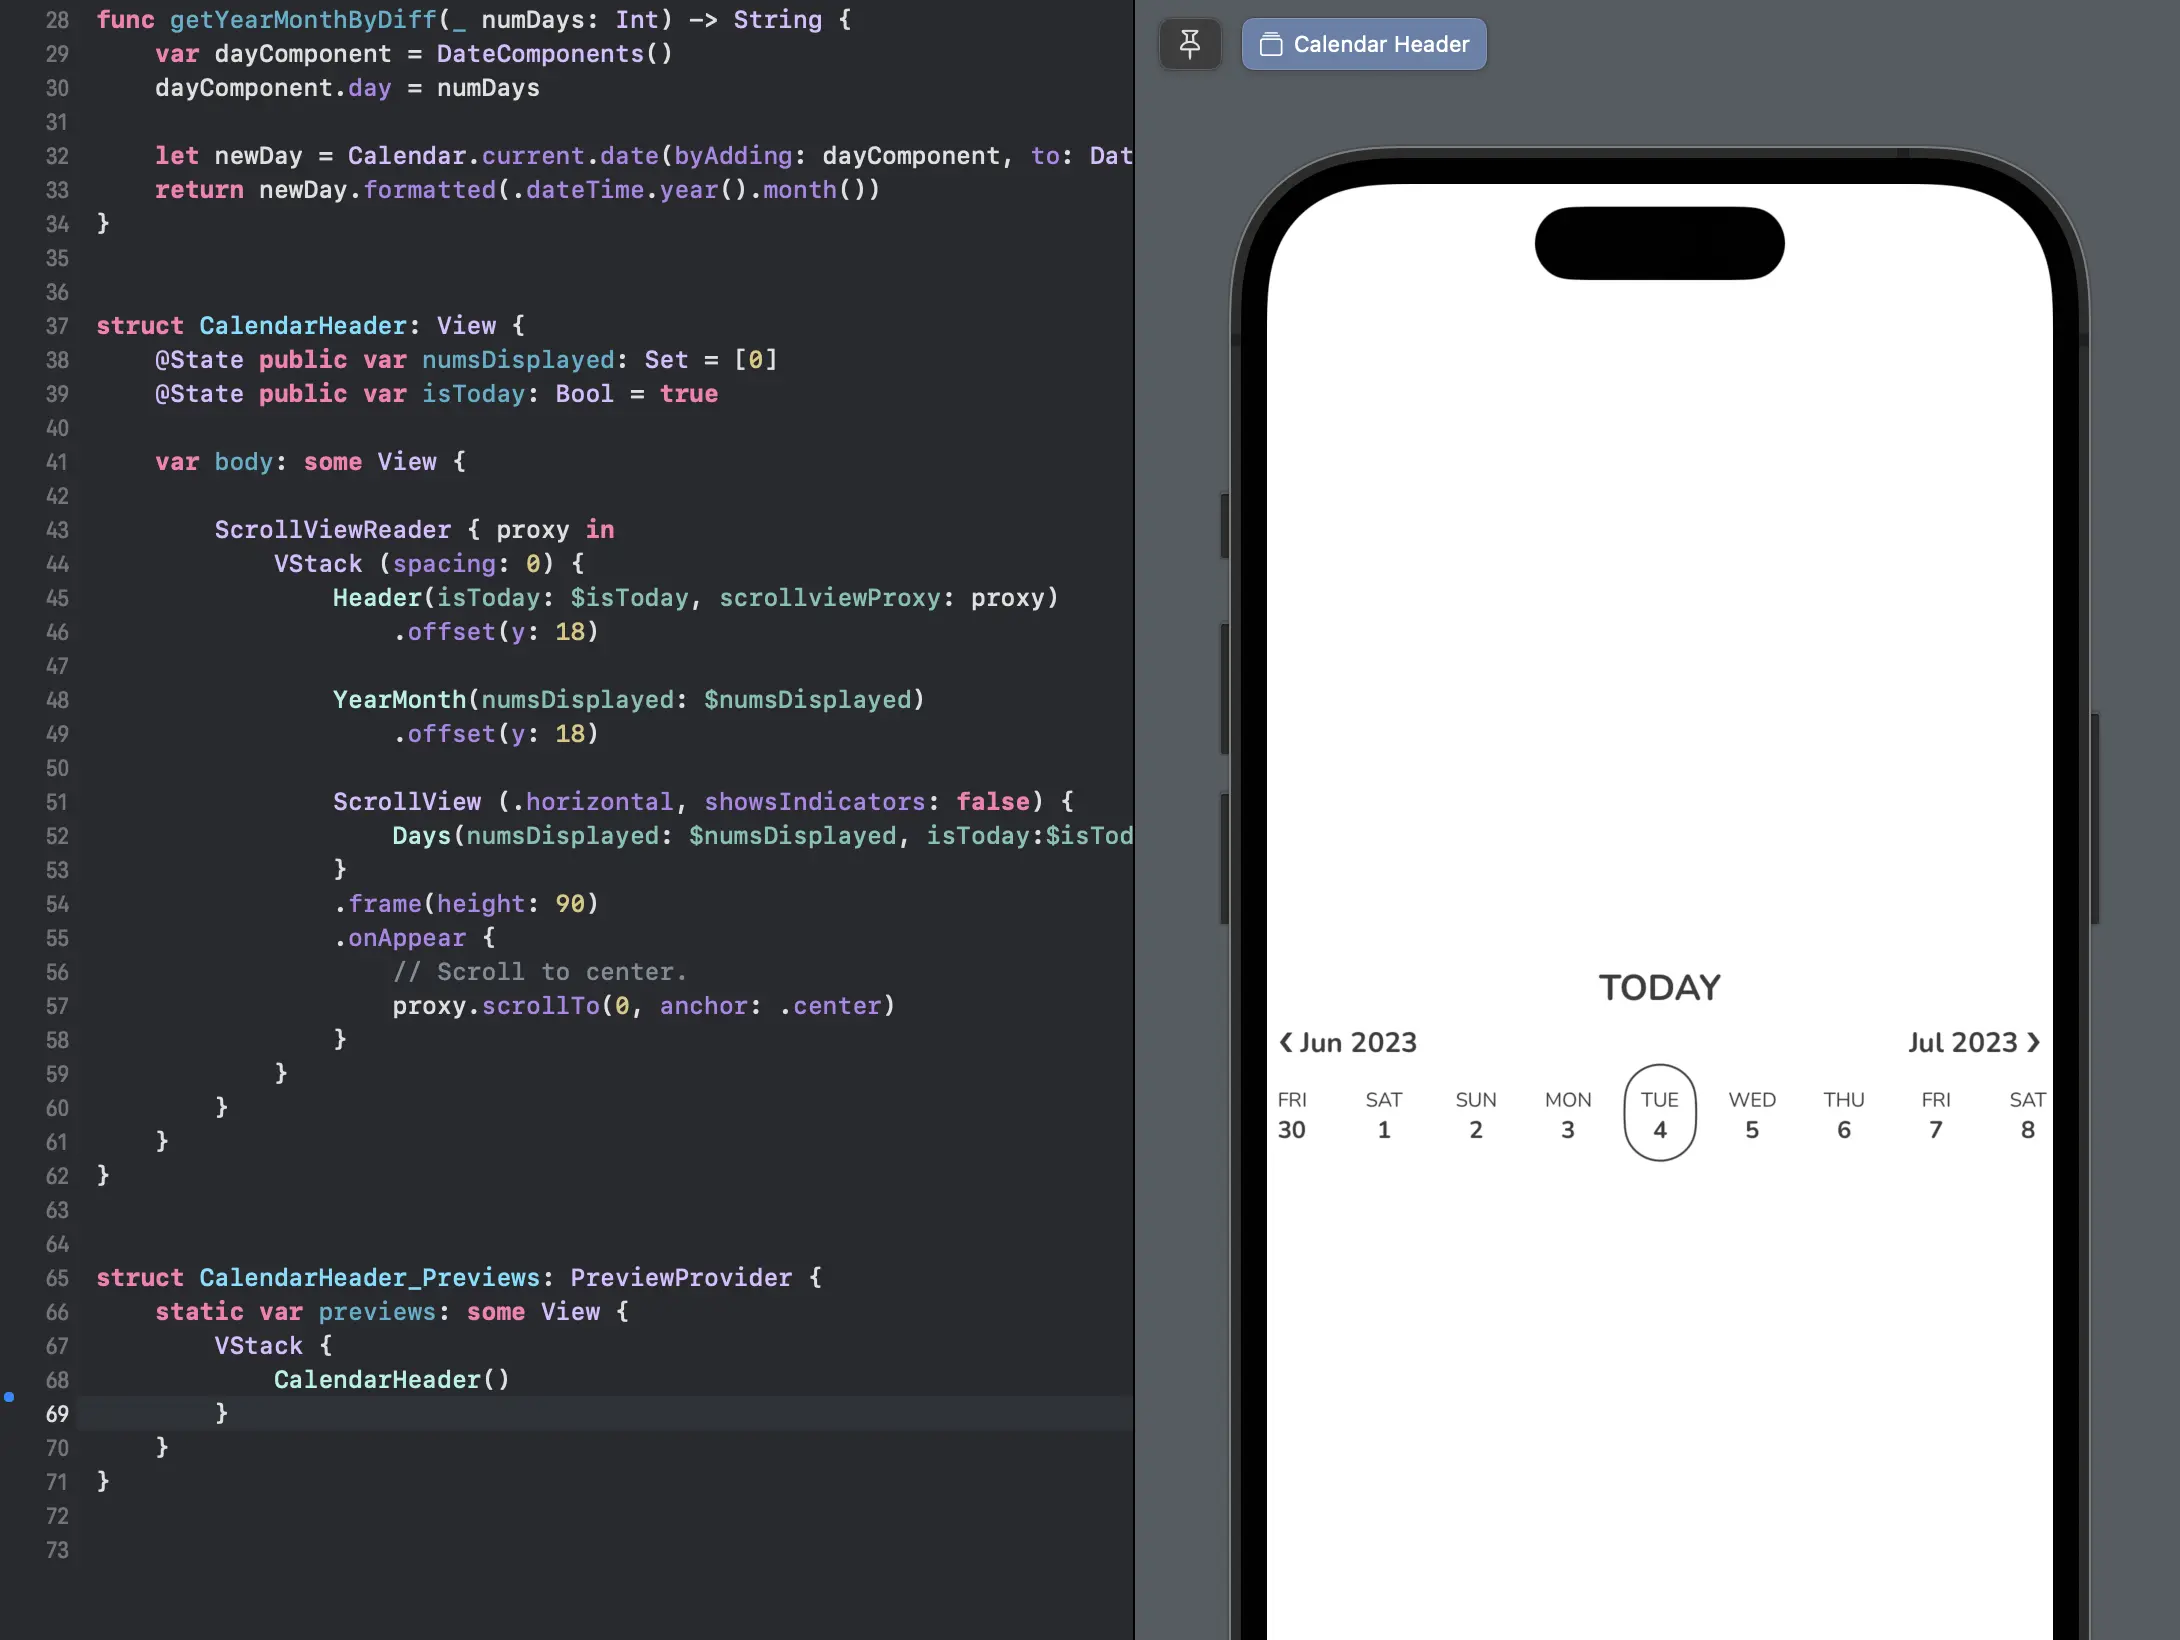
Above: Live preview in Xcode is not just for the full app. It's available for any component (or "view" in SwiftUI terminology).
Highlight: Strong Type System
I absolutely love the strong type system in Swift (the language). Of course,
React Native can be used with Typescript, but you don't have to. Even with
Typescript, you can get away with the notorious any. In Swift, type system is
absolutely strict. Developer intention needs to be explicitly stated.
Related to typing is the concept of optionals, which is another wonderful Swift feature. Optionals are a way to represent values that may or may not exist, and Swift forces you to handle both cases. Again, developer needs to explicitly state their intention. This makes the code less error-prone in the long run.
I find thinking in Swift to be a lot of fun. It's like thinking mathematically, with a lot of rigor and precision.
Highlight: Animation
Animation is an absolute joy in SwiftUI. It's so easy to add animation to any component. For example, here is a simple animation that performs multiple transformations on a box.
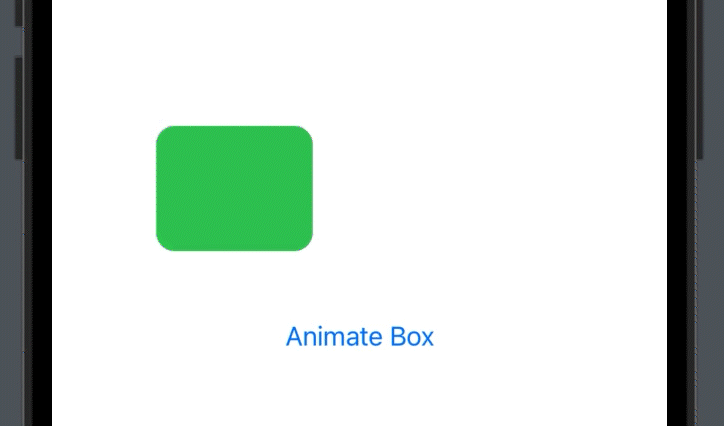
To code this animation, you only need a few lines:
import SwiftUI

struct AnimationView: View {
    @State var animationState: Bool = true

      var body: some View {
          VStack {
              RoundedRectangle(cornerRadius: 12)
                  .fill(animationState ? .green : .red)
                  .frame(width: 100, height: 80)
                  .rotationEffect(.degrees(animationState ? 0 : 180))
                  .scaleEffect(animationState ? 1 : 1.2)
                  .opacity(animationState ? 1 : 0.2)
                  .offset(x: animationState ? -80 : 80)
                  .animation(.easeInOut, value: animationState)

              Button {
                  animationState.toggle()
              } label: {
                  Text("Animate Box")
              }
              .padding(36)

          }

      }
}
Each line of modifiers such as rotationEffect, scaleEffect, opacity, and
offset adds an animated transformation to the box. You can keep piling on more
transformations, and SwiftUI will animate them all together. It's amazing.
When I saw how easy it is to do animations in SwiftUI, my jaw dropped. This caused the piece of chicken I was chewing to fall out of my mouth, which in turn made my dog very happy. It was a joyful moment for both of us.
In comparison, here is what you'd need to achieve the same animation in React Native.
import React, { useRef, useEffect, useState } from "react";

import { Animated, Text, TouchableOpacity, View } from "react-native";

export default function AnimationWithRN() {
  const [animationState, setAnimationState] = useState(true);
  const opacityAnim = useRef(new Animated.Value(1)).current;
  const scaleAnim = useRef(new Animated.Value(1)).current;
  const translationAnimation = useRef(new Animated.Value(-80)).current;
  const rotationAnim = useRef(new Animated.Value(0)).current;
  const rotationAnimStr = rotationAnim.interpolate({
    inputRange: [0, 1],
    outputRange: ["0deg", "180deg"],
  });

  useEffect(() => {
    Animated.timing(opacityAnim, {
      toValue: animationState ? 1 : 0,
      useNativeDriver: true,
    }).start();

    Animated.timing(translationAnimation, {
      toValue: animationState ? -80 : 80,
      useNativeDriver: true,
    }).start();

    Animated.timing(scaleAnim, {
      toValue: animationState ? 1 : 1.2,
      useNativeDriver: true,
    }).start();

    Animated.timing(rotationAnim, {
      toValue: animationState ? 0 : 1,
      useNativeDriver: true,
    }).start();
  }, [animationState]);

  return (
    <>
      <Animated.View
        style={{
          width: 100,
          height: 80,
          backgroundColor: "green",
          borderRadius: 12,
          // All the animation stuff:
          opacity: opacityAnim,
          transform: [
            { translateX: translationAnimation },
            { scale: scaleAnim },
            { rotate: rotationAnimStr },
          ],
        }}
      />

      <View style={{ height: 30 }} />

      <TouchableOpacity
        onPress={() => {
          setAnimationState(!animationState);
        }}
      >
        <Text style={{ color: "blue" }}>{"Animate Box"}</Text>
      </TouchableOpacity>
    </>
  );
}
I actually skipped the color change because that'll be even more code.
Lowlight: All I Want is Custom Border Radius
At this point in my SwiftUI learning journey, I was having a lot of fun. I started to set up my small side project in SwiftUI, and was making good progress for the first couple of tasks. Then I hit an unexpected roadblock.
I was certainly expecting to have a lot more learning curve to overcome with
data and state management. But what I didn't expect was to have trouble with
something as simple as the CSS: border-radius: 18px 18px 18px 0px;
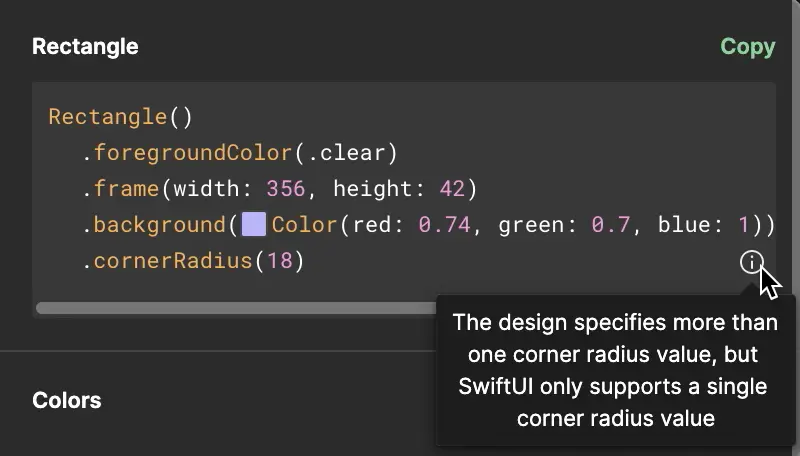
Above: Figma knows what's up.
Turns out SwiftUI doesn't support custom border radius. It's doable but requires some workarounds like extension or custom shape. In addition, I want to have a border around the shape, which creates even more challenges. After an embarrassingly long time, all I could come up with was the uneven border below (left), compared to the desired border that can be done in React Native with simple styling (right).

Recommended SwiftUI Learning Resources
Before we wrap up, here are the best resources I've found for learning SwiftUI.
100 Days of SwiftUI: I love the first 14 days on Swift language fundamentals. Each day also comes with tests that are like little puzzles. It really made me appreciate the Swift language.
Design+Code SwiftUI Handbook: Should I learn design? Or should I learn to code? Why not both! I really like how Design+Code encourages you to learn both, which in the end is what it takes to build an attractive product.
Apple's official SwiftUI tutorial: A very well-designed tutorial that covers many SwiftUI concepts. But it's best to go through it after you have some basic understanding of SwiftUI, say, from one of the two resources above. It can be very "draw the owl". Also the Estimated Time of 4hr 25min is very optimistic, so set aside more time to let the concepts sink in.
Staying Organized and Motivated for Continuous Learning
Keeping up with the latest technology is a challenge for all developers. It's hard to find time to learn new things when you have a full-time job and many other obligations.
HeroMode helps me with my continuous learning journey by making it easy to stay organized and motivated. I can create new learning goals as adventures, and add quests for each small chunk of learning. With quest chaining, I can set up a course as a sequence of quests that unlock one after another. Whenever I have a little free time, I can sneak in a quest or two.
Of course, I'm super biased because I'm the developer of HeroMode. So I hope you will also find it useful for your continuous learning goals!